From ARCHICAD 22 new size and representation handling method has been introduced to the curtain wall panels. This post flies through the creation of a Curtain Wall Panel using the fix named optional parameter set and global variables provided by ARCHICAD.
The example panel of this post is a general fix panel with basic attributes and standard listing parameters.
General information about representation
In the Curtain Wall Tool there is a possibility for some components to automatically display the 2D drawing based on the 3D model. Generally the 2D and 3D modeling belong to the library part, but at the curtain wall panels the Symbolic 2D model, which means that the 2D symbol is created by the library part’s script, is optional. This option can be set on the Curtain Wall Settings dialog at the Floor and Section / Projection Mode.
From ARCHICAD 22 at the Model View Option you can choose the detail level for each component in the Curtain Wall. The detail level for the curtain wall panels can be Full, Simplified or Schematic.
Create a curtain wall panel library part
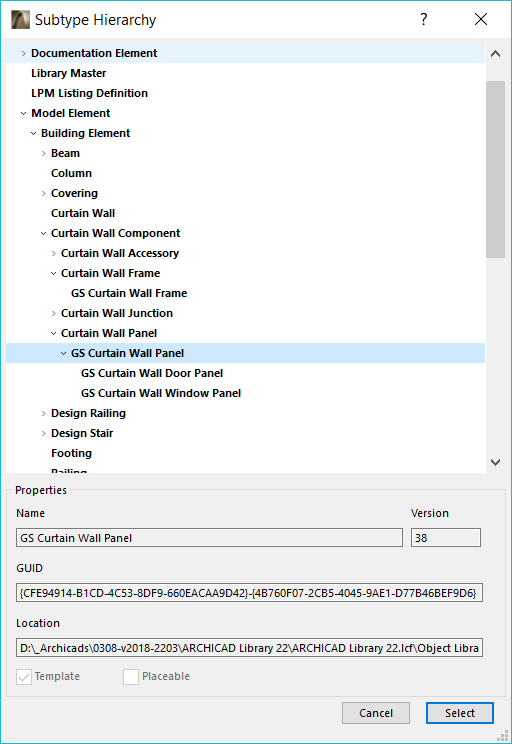
In order to be handled by ARCHICAD as a curtain wall panel component, the library part should be under the Curtain Wall Panel subtype. This subtype provides the necessary fix named optional parameters, which handle the data transfer between the library part and ARCHICAD.
Set the basic control parameters
First you have to decide three main feature of your panel and have to set the right value to the proper parameters. These parameters are read by ARCHICAD and they are hidden from the User Interface Dialog by default.
- Who will be drawing the Schematic model?
AC_AutoSchematicModel: In case the AC_AutoSchematicModel is set toTRUE, a plane is generated by ARCHICAD within the connecting frame axes. The surface of this plane is defined by the pencolor at Floor Plan and Section / Uncut Line Pen. By setting the value of the AC_AutoSchematicModel toFALSE, the Schematic model and its attributes can be handled by GDL.
Compatibility: introduced in ARCHICAD 22. - Where should the origin of the model be?
ac_originIsFrameCenter: If this parameter exists and its value isTRUE, the origin of the 2D model’s coordinate system is placed on the axis line of the connecting frame. Otherwise the origin of the coordinate system can be at the side or at the clamp’s depth of the connecting frame – depending on the ac_aSizeIsWithClamp parameter. - Which measurements have to belong to the A and B dimension parameters?
ac_aSizeIsWithClamp: If this parameter exists and its value isTRUE, ARCHICAD sets the A size as the distance between the frames plus the clamps’ size. The origin of the 2D coordinate system is placed at the frame’s clamp depth. Otherwise, the A size is measured between the frames and the origin of the 2D coordinate system is on the connecting frame’s side.
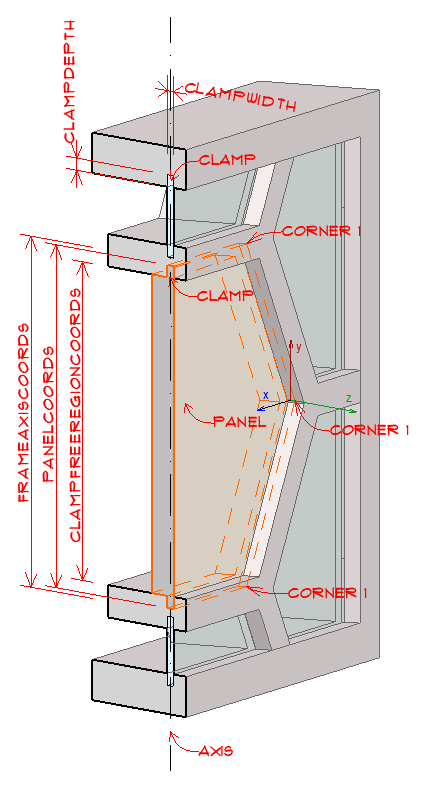
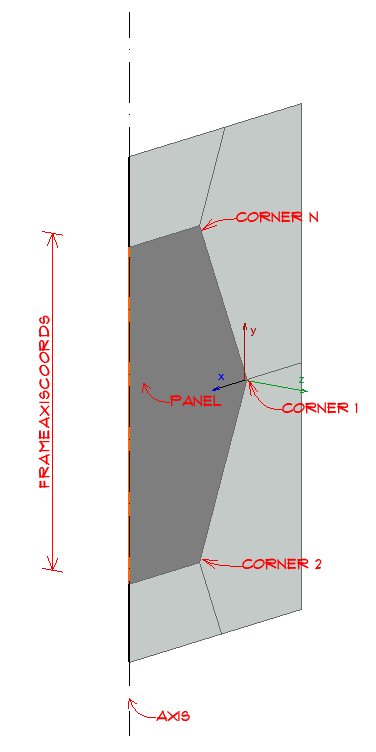
Parameters of a curtain wall panel
The picture below introduces the curtain wall panel parts and parameters on a Full detailed and a Schematic model.
 |
 |
Example for 3D script
For the Full detailed panel above, here you can see the 3D script using some custom parameters for attributes (bMatPanel, penUnCut, penCut) and some fix named parameters which are set by ARCHICAD.
In this example the first panel skin flows inside the frame clamps using the ac_panelCoords parameter. Its thickness is defined by the thickOutsideSkin parameter. The second skin is between the frames, defined by the ac_clampFreeRegionCoords parameter, its thickness is defined by the thickInsideSkin parameter.
The CPRISM_{3} command is used for modelling, the penUnCut parameter for 3D outlines and the penCut parameter for cut lines at section.
building_material bMatPanel
pen penUnCut
sect_attrs{2} penCut

_surface = 1
bSucceed = request{2} ("Building_Material_info", bMatPanel, "gs_bmat_surface", _surface)

nCorners = vardim1(ac_PanelCoords)

! ------- Panel coords with clamps - Outside Panel ------
addz -thickOutsideSkin/2
for i = 1 to nCorners
    put ac_PanelCoords[i][1], ac_PanelCoords[i][2], 0, 8+1+2+4, _surface
next i
cprism_{3} _surface, _surface, _surface, 1+2,
            nsp/5, thickOutsideSkin,
            get(nsp)

!  ------- Panel coords inside the Frames - Inside Panel -------
for i = 1 to nCorners
    put ac_clampFreeRegionCoords[i][1], ac_clampFreeRegionCoords[i][2], 0, 8+1+2+4, _surface
next i

cprism_{3} _surface, _surface, _surface, 1,
            nsp/5, -thickInsideSkin,
            get(nsp)
Set listing parameters for IES and labels
The following subtype parameters have to be set for each curtain wall panel’s parameterscript or parameter section. Note that these parameters have default values – if they are not controlled and overridden, the Interactive Schedule will work with the default values of this parameters, making the schedules useless.