From ARCHICAD 22 new curtain wall representation options has been introduced to the curtain wall components at Model View Options / Curtain Wall Options. This post presents the creation of a curtain wall frame which reacts on the provided options.
MVO Curtain Wall Frame Options
At Model View Options / Curtain Wall Options a checkbox can turn off each component’s visibility, which method is handled by ARCHICAD. The detail level of the curtain wall components should be handled by the library parts based on the values of the provided Curtain Wall Component global variables.

Using AC_AutoSchematicModel fix named optional parameter
The AC_AutoSchematicModel boolean parameter can control the handling method in case of Axis Only MVO detail level. If it is set to 1, ARCHICAD will create the frame model: a 3D line on the Curtain Wall Grid with the pen set at Curtain Wall System / Floor Plan and Section / Outlines / Uncut Line Pen.
Otherwise the library part should draw the Axis Only model using its own attribute set. In the following examples the AC_AutoSchematicModel parameter is turned off in order to provide a comprehensive overview about the MVO sensitivity.
Scripting a model for every detail level
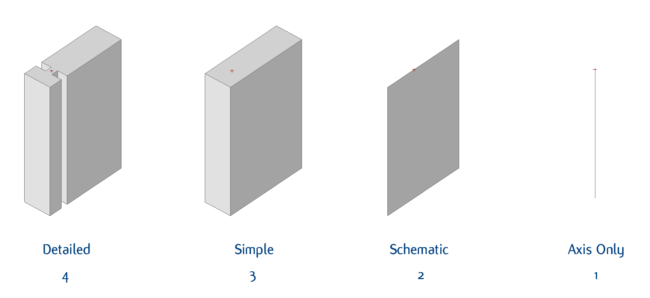
Based on the value of GLOB_MVO_CWFRAME_DETLEVEL global variable different models can be scripted for each detail level. The 3D script below results the following models for the MVO detail level settings:

For the Detailed frame representation the geometry of the Create a curtain wall frame library part post example is used. The Simple representation is a bounding box with the same frame sizes. For Schematic representation a plane, for Axis Only representation a line is created at the frame origin.
In this example named variables are used for the GLOB_MVO_CWFRAME_DETLEVEL constant values and for calculated sizes.
! ====================================================================
! Set constant values and variables
! ====================================================================
! constant values for GLOB_MVO_CWFRAME_DETLEVEL
DETLEVEL3D_AXISONLY	= 1
DETLEVEL3D_SCHEMATIC	= 2
DETLEVEL3D_SIMPLE	= 3
DETLEVEL3D_DETAILED	= 4

_halfWidth		= ac_frameWidth / 2
_negDepthSeg		= ac_frameBackDepth
_pozDepthSeg		= ac_frameDepth - ac_frameBackDepth
For the frame attributes the ac_CWFrameBuildMat, ac_CWFrameCutLinePen and ac_CWFrameCutLineType fix named optional parameters are used. See Create a curtain wall frame library part post for details.
! ====================================================================
! Set attributes
! ====================================================================
building_material ac_CWFrameBuildMat

_frameSurf = 1
bSucceed = request{2} ("Building_Material_info", ac_CWFrameBuildMat, "gs_bmat_surface", _frameSurf)

sect_attrs{2} ac_CWFrameCutLinePen, ac_CWFrameCutLineType
The Detailed and the Simple models have dimensions in the X direction of the frame’s local coordinate system, so for inside or outside boundary member placement their position on the X axis should be modified. The Schematic and Axis Only models have no dimension in the X direction, so they should always be positioned on the curtain wall grid.
if    GLOB_MVO_CWFRAME_DETLEVEL = DETLEVEL3D_SIMPLE     |\
      GLOB_MVO_CWFRAME_DETLEVEL = DETLEVEL3D_DETAILED    then

    ! ====================================================================
    ! Modify position in case of Boundary Frames
    ! ====================================================================
    if CW_BOUNDARY_PLACEMENT <> 0 then
        if CW_BOUNDARY_PLACEMENT = 1 then
            addx -_halfWidth
        else
            addx _halfWidth
        endif
    endif

    if GLOB_MVO_CWFRAME_DETLEVEL = DETLEVEL3D_DETAILED    then
        ! ====================================================================
        ! Detailed Frame
        ! ====================================================================
        ! Use cprism_{3} to control line elimination
        cprism_{3} _frameSurf, _frameSurf, _frameSurf, 1+2,
               12, ZZYZX,
               _halfWidth,                   _pozDepthSeg,         0,  15,  _frameSurf,
               -_halfWidth,                  _pozDepthSeg,         0,  15,  _frameSurf,
               -_halfWidth,                  ac_clampWidth / 2,    0,  15,  _frameSurf,
               -_halfWidth + ac_clampDepth,  ac_clampWidth / 2,    0,  15,  _frameSurf,
               -_halfWidth + ac_clampDepth,  - ac_clampWidth / 2,  0,  15,  _frameSurf,
               -_halfWidth,                  - ac_clampWidth / 2,  0,  15,  _frameSurf,
               -_halfWidth,                  - _negDepthSeg,       0,  15,  _frameSurf,
                _halfWidth,                  - _negDepthSeg,       0,  15,  _frameSurf,
                _halfWidth,                  - ac_clampWidth / 2,  0,  15,  _frameSurf,
                _halfWidth - ac_clampDepth,  - ac_clampWidth / 2,  0,  15,  _frameSurf,
                _halfWidth - ac_clampDepth,  ac_clampWidth / 2,    0,  15,  _frameSurf,
                _halfWidth,                  ac_clampWidth / 2,    0,  15,  _frameSurf

    else
        ! ====================================================================
        ! Simple Frame
        ! ====================================================================
        ! Use cprism_{3} to control line elimination
        cprism_{3} _frameSurf, _frameSurf, _frameSurf, 1+2,
                    4, ZZYZX,
                     _halfWidth,    _pozDepthSeg,    0,  15,  _frameSurf,
                    -_halfWidth,    _pozDepthSeg,    0,  15,  _frameSurf,
                    -_halfWidth,    - _negDepthSeg,  0,  15,  _frameSurf,
                     _halfWidth,    - _negDepthSeg,  0,  15,  _frameSurf
    endif

    if CW_BOUNDARY_PLACEMENT <> 0 then del 1
else
    if GLOB_MVO_CWFRAME_DETLEVEL = DETLEVEL3D_SCHEMATIC then
        ! ====================================================================
        ! Schematic Frame
        ! ====================================================================
        plane_ 4,
            0,   -_negDepthSeg,   0,       15,
            0,   _pozDepthSeg,    0,       15,
            0,   _pozDepthSeg,    ZZYZX,   15,
            0,   -_negDepthSeg,   ZZYZX,   15
    else
        ! ====================================================================
        ! Frame Axis on the Grid
        ! ====================================================================
        lin_ 0, 0, 0, 0, 0, ZZYZX
    endif
endif